• Easy Hikes
  • Moderate Hikes
  • Strenuous Hikes
  • Waterfalls
  • Outdoors
  • Distance hikes
  • Peaks
  • Caves
  • News
  • The 10 Essentials
  • Directions to our Favorite Trails

Your Favorite Hiker

~ Exploring SoCal and beyond!

Your Favorite Hiker

Tag Archives: outdoors

Mile Mile and a Half Movie Screening

27 Tuesday Aug 2013

Posted by Alex G in Outdoors

≈ 1 Comment

Tags

backpacking, california, Hiking, JMT, John Muir trail, mountains, movie, nature, orange county, outdoors

image

http://www.tugg.com/events/5189

Mile…Mile & A Half in Orange, CA on Wednesday, September 25, 7:00pm

Trying to get enough people  signed up to get this awesome movie brought to OC for us to enjoy.

Please spread the word!

Like this:

Like Loading...

The Wally Waldron Tree

31 Friday May 2013

Posted by Alex G in Distance hikes, Outdoors, Peaks, Strenuous Hikes

≈ Leave a comment

Tags

Hiking, limber pine, nature, outdoors, San Gabriel Mountains, wally Waldron

image

The Wally Waldron tree is  one of the oldest trees in the San Gabriel Mountains  estimated to be older than 1,500 years.
  It is named after Wally Waldron who was a member of the executive board of the LA area council of the Boy Scouts. 
  The tree is at the junction with the PCT and the trail that leads up to the summit of Mt. Baden Powell.

image

The Wally Waldron Tree viewed from the PCT

Like this:

Like Loading...

Deer Trail – Santiago Oaks Regional Park

04 Thursday Apr 2013

Posted by Alex G in Outdoors, Uncategorized

≈ Leave a comment

Tags

Hiking, nature, OC Parks, orange county, outdoors, Santiago oaks

image

Deer Trail

Santiago Oaks is one of my favorite parks to visit for a quick day hike. The nearly 2,000 acre park is on the border of wilderness and residental areas making it easly accessible. There are many trails within the park one of my favorite is the Deer Trail. At under a mile this small detour is worth the visit.

image

The trail can be access via Burnham Ridge or as you come down Robbers Peak. This is some what of a spur trail but there is also another trail that leads up and away from the canyon but that will take you to Weir Canyon so avoid that trail.

image

Meadow at the bottom of Deer Trail

The trail quickly descends the backside of Santiago Oaks and parallels this nice meadow and Oak grove. Make sure to pay this beautiful trail a visit on your next visit to Santiago Oaks.

Click here for directions

Like this:

Like Loading...

TO THE TOP OF VERNAL AND NEVADA FALLS

13 Thursday Sep 2012

Posted by Alex G in Distance hikes, Outdoors, Strenuous Hikes, Waterfalls

≈ Leave a comment

Tags

falls, Hiking, JMT, John Muir trail, mist trail, nature, Nevada, outdoors, sierra, trail, trek, vernal, waterfall, Yosemite

VERNAL AND NEVADA FALLS

During my last trip to Yosemite my buddy Hugo and brother Fidel decided to check out these two waterfalls.. Seeing as they were the only two left that still had flowing water we decided to tackle both of them in one hike.

The first of these two waterfalls is Vernal Falls which is 317 ft and is the smaller of the two. The waterfall first comes to view just .8 miles into the hike. Here on the Vernal Fall Bridge you will get your first glimpse of  one of Yosemite’s many beauty’s!

Vernal Falls Bridge

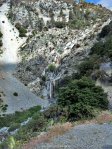
The next .7 miles are far from easy! The Mist Trail consists of hard granite steps that seem to get higher and endless with every step! The beginner or average hiker might find this section a bit difficult.

Mist Trail leading to the top of Vernal Falls

Getting to the top of Vernal Fall is a nice hike all in its own . One could turn back once at the top and have a very rewarding 3 mile hike checked off their list, orrrr………..

Top of Vernal Falls

You could continue up the Mist Trail as we did  for 1.9 miles to the Larger and more impressive Nevada Fall. At 594 ft this magnificent waterfall almost doubles the height of Vernal fall. Along the way we stopped to check out Emerald pool. Considering it was late August and the weak winter there was still a substantial amount of water.

Emerald Pool

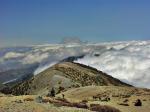
After our quick detour we picked up the trail again and continued on. Views are Nevada Falls begin to appear giving you that extra motivation just in case thoughts of quitting are crossing your mind. Just remember, start early, take your time and drink lots of water… 3 keys to finishing any hike!

First glimpse of Nevada Falls

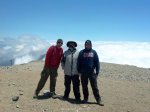
The image above is all I need to keep me going. When it comes to exploring I am a very driven individual. I never doubted myself not even once.. I wasn’t going to let a few measly granite steps keep me from accomplishing this goal.

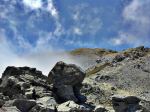
Finally! We reached the top! We went over to the top of the falls overlook and took in the gorgeous scenery that is the Sierra Nevadas. Looking down on the 600ft beast was a very humbling experience..

Looking down Nevada Falls

Getting here was not easy but the payoff was about to come in the form of the JMT! (John Muir Trail)

We had two options for our return trip, A) go back the way we came orrrrrr B.) venture off onto the JMT and doing a lollipop loop back to Vernal Fall Bridge.. Yeah we went with option B.) lollipopping it adds about an extra mile but it is well worth it!
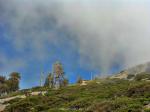
Entering the JMT

Anytime you have the opportunity to loop a hike I go for it! Every step and turn offers something new. Its like 2 hikes in one. The JMT section descends down the opposite side of the canyon than the way you came up. The scenery and views are totally different. This section of the JMT is well shaded and gradually switchbacks it’s way down to the start of the mist trail. (A lot better than returning via the Mist Trail).

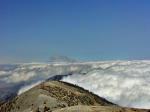
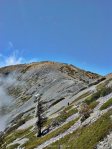
Nevada Falls can be seen from this side with great clarity. No obstructions what so ever!

Nevada Falls from the JMT

All in all we did about 8 miles round-trip. Explored new trails, saw 2 amazing waterfalls hiked on the JMT and still made it back to camp in time for lunch! This, like most hikes, was an amazing experience! Its definitely a must do for any hiker visiting Yosemite.

Happy Trails,

Alex G

To get to the trail-head one can take the Yosemite Valley Shuttle to the Happy Isle shuttle stop or you can drive to the parking lot just before the shuttle stop. The parking lot does fill up so arrive early.

This slideshow requires JavaScript.

  • 317 ft Vernal Falls
  • 594 ft Nevada Falls
  • 8 miles lollipop loop (via Mist trail and JMT)
  • 6.8 out and back( Nevada Falls)
  • 3 miles out and back (Vernal Falls)
  • 1.6 miles out and back (Vernal Fall Bridge)
  • 1,000 ft elev gain to Vernal Fall
  • 2,000 ft gain to Nevada Fall
  • hiking poles recommended

Like this:

Like Loading...

MOUNT BALDY (via the Ski Hut Trail)

27 Wednesday Jun 2012

Posted by Alex G in Distance hikes, Outdoors, Peaks, Strenuous Hikes, Waterfalls

≈ Leave a comment

Tags

distance, Hiking, manker flats, mount, mount baldy, mount whitney training hike, mountain, outdoors, peak, san antonio, San Gabriel Mountains, ski hut, strenuous, trail, waterfall

SAN ANTONIO FALLS

With my Mount Whitney hike fast approaching I decided to get serious about my training. Already have done Mt Baldy (via Old Baldy Trail) which was a butt kicker I decided to try out the shorter but equally as hard route to the summit. At 4.2 miles and with a gain of 4,000 ft. This is the shortest and quickest way to the top.

The trail begins at the intersection of Mt. Baldy Rd and Falls Rd. there is plenty of parking and a Forest Adventure pass is required. The first mile of this hike is on a road. At .5 miles you will reach San Antonio Falls. On this particular May day the falls were less impressive than I had imagined.. but hey it was a pretty dry winter.

After making a sharp right turn past the falls the roads turns to the left and at about .8 miles  there will be an unmarked steep  single track trail to your left. This us the Ski Hut Trail. If you aren’t paying attention, you will miss it. We almost did if it wasn’t for a fellow hiker.

The next 3.5 miles are unbelievable, amazing and breathtaking! (Especially the breathtaking part) As soon as I started I immediately knew it was going to be a tough hike. I caught myself stopping more frequently than ever before.

It felt like the torture would never end!

What seemed to be an eternity was really only like an hour and a half of hiking… Finally through the cover of the clouds I got a glimpse of the ski hut.

FIRST VIEW OF THE SKI HUT ON A CLOUDY MORNING

Finally! The halfway point… great place to rest, re-energize, take a bathroom break and carb up before continuing on the final half of the hike.

ONE OF THE MANY PLACES TO REST AT THE SKI HUT

After a nice 30 minute rest. We geared up and continued on our mission! Just 2 more miles! Sounds easy but there is still one last hard section before the final push!

My buddy Neal

Winding our way up the mountain through a series of boulders and pines. There was no snow left on the mountain but there was a lot of ice covered trees. Which made for great photos.

After the last hard part the trail becomes relatively easy and the blue skies begin to open up indicating that the top of the ridge is getting closer. This usually gives me that extra motivation to keep on trekking!

NEARING THE TOP

YOURS TRULY, ON THE SUMMIT

This is probably the best 4.5 mile hike around. It offers a bit of everything.. A waterfall, a steep incline, beautiful scenery and an amazing view! Definitely a must do for all serious hikers!

  • 4.5 miles to the top
  • Difficulty – strenuous
  • 4,000 ft elevation gain
  • beautiful scenery
  • waterfall
  • 10,064
  • highest point in LA

RETURN OPTIONS:

  1. Return the way you came (9 miles)
  2. go down the devils backbone which will take you back to the trailhead with an added 2 miles on the return (apprx. 11 miles  r.t)
  3. go down Old Baldy Trail (6.4 miles) requires a car shuttle (11 miles r.t)
GETTING CLOSER TO THE SUMMIT!
ICY TREES ON THE FINAL PUSH
PHIL MYSELF AND NEAL

LOOKING TOWARDS THE DEVILS BACKBONE
HIKING ABOVE THE CLOUDS
TWISTED TREE

SKI HUT OUTHOUSE
VIEW FROM THE SUMMIT
YOURS TRULY, ON THE SUMMIT

ALMOST TO THE TOP
SKI LIFT

DEVILS BACKBONE TRAIL
ABOVE THE CLOUD LINE 10,054 FT
A VIEW FROM THE SUMMIT

ICE COVERED TREE
NO SNOW, BUT LOTS OF ICE
SKI HUT

FIRST VIEW OF THE SKI HUT ON A CLOUDY MORNING
ONE OF THE MANY PLACES TO REST AT THE SKI HUT


ON THE SUMMIT
LOOKING BACK UP AT BALDY, VIA DEVILS BACKBONE TRAIL
LOOKING BACK UP AT BALDY

ICY PINES
SAN ANTONIO FALLS

NEARING THE TOP

Like this:

Like Loading...

LIMESTONE CANYON GRAND TOUR

02 Monday Apr 2012

Posted by Alex G in Distance hikes, Outdoors, Strenuous Hikes

≈ 2 Comments

Tags

CONSERVANCY, distance, Hiking, irvine, limestone, outdoors, RANCH, THE SINKS

image

Early this week I was lucky enough to be able to join the IRC on their Limestone Canyon Grand Tour hike. This hike covers all trails exterior and interior within the boundaries of Limestone Canyon Open Space Preserve . Totaling a little over 16 miles this is a long hike with multiple ups and downs. The trailhead for this hike is located at the Augustine Staging Area just off of Santiago Canyon Road. This hike is only available by signing up on the Activities page on the IRC website.

The Sinks from East Loma Ridge

This is a great way to see the whole park in its entirety with limited distractions. You will have the whole park to yourselves!

Dripping springs


The IRC hosts an open access day once a month for self guided tours of the park, although not all trails are open one can still see most of the park within 7-8 hours.

Along the way you will make multiple stops
1. To catch your breath.
2. To visit Box and Dripping springs which have water year round (great opportunities to see wildlife).
3. Stop on Limestone Ridge and Loma Ridge to check out the views of The Santa Ana’s, Orange County and Catalina and the San Gabriels on a clear day.
4. Last but not least, to visit The Sinks! A natural landslide that occurred millions of years ago!

CLICK HERE FOR MAP AND HIKE DETAILS OF MY HIKE

This slideshow requires JavaScript.

  • estimated hike time 7 hours
  • 16 miles
  • only available through IRC
  • over 1,500 ft elev. gain


Like this:

Like Loading...

BLACK MOUNTAIN -HENDERSON,NV

20 Tuesday Mar 2012

Posted by Alex G in Moderate Hikes, Outdoors, Peaks, Strenuous Hikes

≈ 2 Comments

Tags

Black, Henderson, Hiking, Las Vegas, mountain, Nevada, outdoors, peak

image

Trailhead

Black Mountain is located just 30 minutes from the Las Vegas strip and at just under 7 miles this hike offers a great workout that can be completed in just a few hours, leaving you plenty of time left to enjoy the nightlife of Vegas.

This is a beautiful place to hike. The landscape is like nothing I’ve seen before. The mountain itself is volcanic in origin and that is evident as soon as you step foot on the trail.

The trail has a variety of desert plant life such as Joshua Trees, cactus and  Creosote bush.

image

The hike itself is rather easy except for the last half mile or so. For the most part the ascend is gradual all the way up to black hill, it is from here that you will see the ridgeline before you and then the final push begins.

image

The Ridge line to the Peak!

This part of the trail has the potential to be pretty dangerous as the ridge line is very rocky and steep at some points. I had my trekking poles which I recommend for this hike.

Once you reach the peak you will hopefully see an American flag flapping in the wind, (it wasn’t there on this hike) and a military ammo case filled with notepads and geocache like items.. I signed it as did many other hikers before me

image

Looking East from the Peak

image

Looking North West from the peak

image

Mt Charleston in the distance

The views from the top of the 5,092 ft peak are amazing. Red Rock Canyon, Mt Charleston and Lake Mead are visible from here. The 360 views from here are breathtaking!

image

image

Black Mountain Peak 5,092ft
Las Vegas Valley, The strip is in the upper right hand side

Click here for directions

• 7 miles roundtrip
• 5,092 ft peak
• Trekking poles recommended
• 2,100 foot elevation gain

Happy Trails,
Alex G.

Like this:

Like Loading...

TOP OF YOSEMITE FALLS

16 Friday Mar 2012

Posted by Alex G in Outdoors, Strenuous Hikes, Waterfalls

≈ 4 Comments

Tags

falls, Hiking, outdoors, sierra nevada, switchbacks, upper, waterfall, Yosemite

This past weekend my wife and I packed our bags and headed to Yosemite. Since it was our first time going we had no idea what to expect or what trails to hike. We had recently seen an episode of Motion and decided that climbing to the top of the falls would be a great day hike and a good way to see Yosemite Valley from above.

Trailhead

The trailhead for this hike is located at the Camp 4 parking lot. At first glance one would see this sign and think 3.5 miles is a piece of cake, well, this hike is far from that! This 3.5 mile hike on the Yosemite Falls Trail consists of 60 switchbacks and over 2,500 ft of elevation gain. This hike was not easy! I’ve done some pretty tough hikes that were well over 15 miles and this hike was right up there with them in the difficulty level.

The beginning of the hike is rather easy. (in comparison to the last part) The trail starts to switchback out of the campsite. You will be hiking under the tree canopy for a good portion of this beginning section of this trail.

After about a mile and 20 switchbacks later the trail levels off for a little bit and you will come upon a lookout point named Columbia Rock. This is great place to take some pictures and enjoy the views.

view from Columbia Rock

From here the trail starts descending a few hundred feet and soon you will have your first look at Upper Yosemite Falls

First view of Upper Falls

By this time you will be in such amazement and might even think to yourself that this hike isn’t too bad.. well at this point id say you are about 2/3 of the way to the top.. but the last part is the hard part.. the last 40 switch backs are tough but if you’ve come this far there is no way you are turning back.

Don’t let the massive cliff walls intimidate you as the final push is only about a mile long.

Once you reach the top  you will have to drop down some steps along the cliff side HOLD ON, be careful and enjoy the sights ans sounds!

The effort will be well worth it as the views from the top of the 2,425 ft waterfall are unbelievable!

Top of Yosemite Falls


Yosemite Valley


my wife and I at the top of the falls

We averaged around 1 mile an hour and and made it to the top in 3 hrs 20 min. This included a 15 minute break and tons of stops for pictures. The trail takes you straight to the top where you will hit a junction for Eagle Peak trail(left) and Yosemite Falls (Right)

Happy Trails

Alex G

This slideshow requires JavaScript.

  • 3.5 miles (7 miles roundtrip)
  • 2,500+ ft elevation gain
  • 3-4 hours to reach the top
  • difficulty – strenuous
  • trekking poles recommended
  • amazing views

Like this:

Like Loading...

WEST HORSETHIEF – TRABUCO CANYON LOOP

09 Monday Jan 2012

Posted by Alex G in Cave, Distance hikes, Strenuous Hikes

≈ 2 Comments

Tags

cleveland national forest, Hiking, outdoors, Trabuco canyon trail, Trails, west horsethief

image

Trabuco trailhead

This is a wonderful 10.5 mile loop that begins at the Trabuco trailhead. To reach the trailhead you you have to travel about 5.5 miles up Trabuco Creek Rd. This parking lot is a mile or so past the Holy Jim parking lot and is a lot smaller. It only fits about 6 vehicles so arrive early.

From the trailhead you will hike through a well shaded single track trail with a couple creek crossings, an old abandoned car and a sealed up mine. You will be on this trail for 1.7 miles until you reach the junction with the west horsethief trail.

image

abandoned car from the mining era

image

Sealed up mine

Once here you can go either straight or hang a right and the continue on the Trabuco Canyon trail. They both lead you up to the Main Divide Rd. The west horsethief trail is slightly harder since it is nothing but switchbacks and is fully exposed. The Trabuco trail partially exposed for the first mile or so then changes to a well shaded trail.

We took the easier route and took the Trabuco canyon trail. This trail offers great views of Santiago peak.

image

Santiago Peak from Trabuco Canyon Trail

The first part of this trail it fully exposed and can be a bit difficult but gets relatively easy once in the shade. About a mile before reaching the Main Divide Rd we came across a Christmas Tree that was decorated with ornaments apparently its a tradition amongst mountain bikers to decorate a tree during the holidays. This made for a great picture spot and a quick rest break.
image

Christmas Tree in the CNF

image

Pacific Ocean in the distance

Once you reach the main divide rd you will have a great view of Lake Elsinore.
image

Lake Elsinore

From here take the first left you will be on this trail for 2.5. On a clear day you will have great views of the 3 biggest peaks in So.Cal

image

Mt. Baldy, Mt. San Gorgonio, Mt. San Jacinto

After being on this trail for 2.5 miles you reach the West Horsethief Trail.
image

Trail is directly behind this post

This is a 2 mile trail that consists of nothing but switchbacks. It offers great views of Trabuco Canyon. From here it’s a total of 3.7 miles back to the parking lot.

This slideshow requires JavaScript.

Happy trails, Alex G. * HIGH CLEARANCE VEHICLE RECOMMENDED * • 10.5 mile loop • Creek crossing • sealed mine • Adventure pass required • 2,300 ft elevation change

Like this:

Like Loading...

LOS PINOS PEAK (via The Lazy W)

28 Wednesday Dec 2011

Posted by Alex G in Distance hikes, Peaks, Strenuous Hikes

≈ Leave a comment

Tags

bluejay campground, CNF, Los pinos, outdoors, peak

image

image

image

Los Pinos Peak (4,510 ft) is the 4th tallest peak of the Santa Ana Mountains and is located in the Cleveland National Forest.

The peak is accessible via the Los Pinos Trail and can be accessed from two points. One being via the Main Divide Rd, which is the easiest route to the peak. The 2nd is from the Los Pinos Trail via The Lazy W. This is the hardest route to reach the summit and is the way we decided to ascend the peak.

We parked one vehicle at the San Juan Trailhead which is in the back of Blue Jay Campground. We then carpooled to the other end of San Juan Trailhead which is located just before The Lazy W Methodist Camp. Before attempting this hike be sure to ask the camp for permission, being as the trailhead is on private property.

This is a tough hike! Only attempt it if you are ok with hiking long distances and are used to inclines as this trail is a combination of both. The hike was a total of 14 miles from one car to another. The elevation change from the base to the the peak is 3,300 ft but the total gain with all the”up and downs” is closer to 7,200 ft so be prepared!

On a clear day the hike along the ridge offers great views of the Pacific ocean, Catalina, San Jacinto, Baldy, San Gorgonio, Lake Elsinore and of course Santiago Peak.

The hike is along the ridge the whole time and it’s not very shaded. Be sure to bring a hat and sun block as you will be exposed to the sun the majority of the time.

Happy Trails,

Alex G

my map of the hike

image

• 4,510 ft peak

• 14 mile one way trail

• 3,300 elevation change

• Lots of “up and downs”

• 7 hours to complete

• Difficulty- Strenuous


This slideshow requires JavaScript.

Like this:

Like Loading...
Newer posts →

Blog Stats

  • 119,167 views

Top Posts & Pages

  • BLACK STAR CANYON INDIAN VILLAGE
  • HARDING CANYON WATERFALL
  • HAGADOR CANYON
  • EATON CANYON WATERFALL
  • Quail Mounatin
  • LIMESTONE CANYON LOOP

Enter your email address to follow this blog and receive notifications of new posts by email.

Join 401 other subscribers

Advertisement

Archive

Blog at WordPress.com.

Privacy & Cookies: This site uses cookies. By continuing to use this website, you agree to their use.
To find out more, including how to control cookies, see here: Cookie Policy
  • Follow Following
    • Your Favorite Hiker
    • Join 61 other followers
    • Already have a WordPress.com account? Log in now.
    • Your Favorite Hiker
    • Customize
    • Follow Following
    • Sign up
    • Log in
    • Report this content
    • View site in Reader
    • Manage subscriptions
    • Collapse this bar
 

Loading Comments...
 

    %d bloggers like this: