• Easy Hikes
  • Moderate Hikes
  • Strenuous Hikes
  • Waterfalls
  • Outdoors
  • Distance hikes
  • Peaks
  • Caves
  • News
  • The 10 Essentials
  • Directions to our Favorite Trails

Your Favorite Hiker

~ Exploring SoCal and beyond!

Your Favorite Hiker

Category Archives: Waterfalls

LOWER DARWIN FALLS – DEATH VALLEY NATIONAL PARK

26 Sunday Apr 2015

Posted by Alex G in Easy Hikes, Outdoors, Waterfalls

≈ 2 Comments

Tags

Creek, death valley national park, desert, DVNP, easy hike, Hiking, mojave desert, national park, outdoors, waterfall

image

Darwin Falls Rd.

This beautiful,and I do mean beautiful  hike starts after a bumpy 2 mile drive on Darwin Falls Rd. The marked trailhead holds about 10 cars.

image

Darwin Wash

From the parking lot continue past the information board and up the wash. The dry creek bed is littered with debris  from past flash floods so check the weather before  entering the wash. 

image

Entering the oasis

About three quarters of a mile up the wash the green begins to appear and the riparian habitat  reveals itself. The canyon narrows and soon enough you’ll  find yourself crossing creeks and jumping boulders.

image

Riparian habitat in the desert, Darwin Creek

Darwin Creek reveals more of  itself the closer you get and the sound of the flowing creek becomes louder

image

Darwin Creek

Small cascades lure you closer and gushing sounds of lower Darwin Falls motivate you to pick up the pace. After some creek crossings and a little bush whacking, you arrive to one of, if not  the best features in Death Valley National  Park.

image

Beautiful Lower Darwin Falls

Beautiful  Lower Darwin Falls. Upper falls and a beautiful fern gully sit above the lower falls. To access it you have to climb up on the left of the cliff face. Use extreme  caution if you decide to do this. I saw a few people  heading up but didn’t go because  I had my daughter with me.

● Trail difficulty – Easy
● 2 Mile out and back
● 20 ft waterfall
● Riparian habitat
● Bird watching
● Wildlife viewing

Click for directions
Darwin Falls Trailhead

Like this:

Like Loading...

Image

Holy Jim – April 21, 2013

21 Sunday Apr 2013

Tags

Creek, hike, Holy jim, santa ana mountains, Santiago creek, Trabuco canyon, waterfall

image

The waterfall is still running….weakly, but still running.

Click for info on getting to Holy Jim Waterfall

Like this:

Like Loading...

Posted by octrailhikers | Filed under Moderate Hikes, Waterfalls

≈ Leave a comment

Kyndall Jack has been found alive!!

04 Thursday Apr 2013

Posted by octrailhikers in News, Waterfalls

≈ Leave a comment

Tags

falls canyon, found, Hiker, Holy jim, kyndall jack, lost, missing, Nicholas cendoya, Trabuco canyon

image

image

Kyndall Jack has finally been found. She was found very near where her hiking companion was found last night. She was airlift off of the canyon wall near Falls Canyon. I’m very glad to be wrong about this outcome!

Like this:

Like Loading...

One Hiker Found … One Still Missing

03 Wednesday Apr 2013

Posted by octrailhikers in News, Waterfalls

≈ 1 Comment

Tags

falls canyon, found, hikers, Holy jim, lost, missing, rescue, Trabuco canyon, waterfall

image

Nicholas Cendoya was finally found late Wednesday night near Falls Canyon. Falls Canyon is a small trail off of Trabuco Creek Road just about 2 miles before the Holy Jim trailhead. Nicholas stated to authorities that Kyndall Jack was still alive and further up the trail from where he was found. Rescue Teams have not yet located her.

Personally, of course I’m hoping she is found alive and well, but it does seem odd that Cendoya would leave her out there. Not to mention that the Falls Canyon Trail is a pretty short trail and for them to get “lost” still sounds unlikely to me.

Like this:

Like Loading...

Hikers Missing Near Holy Jim

02 Tuesday Apr 2013

Posted by octrailhikers in News, Waterfalls

≈ 4 Comments

Tags

cleveland national forest, Hiking, Holy jim, lost, missing, Trabuco canyon, waterfall

image

I’m always surprised when hikers go missing near Holy Jim. It is one of the easier trails in Orange County, but this happens on a fairly regular basis.

Like this:

Like Loading...

TO THE TOP OF VERNAL AND NEVADA FALLS

13 Thursday Sep 2012

Posted by Alex G in Distance hikes, Outdoors, Strenuous Hikes, Waterfalls

≈ Leave a comment

Tags

falls, Hiking, JMT, John Muir trail, mist trail, nature, Nevada, outdoors, sierra, trail, trek, vernal, waterfall, Yosemite

VERNAL AND NEVADA FALLS

During my last trip to Yosemite my buddy Hugo and brother Fidel decided to check out these two waterfalls.. Seeing as they were the only two left that still had flowing water we decided to tackle both of them in one hike.

The first of these two waterfalls is Vernal Falls which is 317 ft and is the smaller of the two. The waterfall first comes to view just .8 miles into the hike. Here on the Vernal Fall Bridge you will get your first glimpse of  one of Yosemite’s many beauty’s!

Vernal Falls Bridge

The next .7 miles are far from easy! The Mist Trail consists of hard granite steps that seem to get higher and endless with every step! The beginner or average hiker might find this section a bit difficult.

Mist Trail leading to the top of Vernal Falls

Getting to the top of Vernal Fall is a nice hike all in its own . One could turn back once at the top and have a very rewarding 3 mile hike checked off their list, orrrr………..

Top of Vernal Falls

You could continue up the Mist Trail as we did  for 1.9 miles to the Larger and more impressive Nevada Fall. At 594 ft this magnificent waterfall almost doubles the height of Vernal fall. Along the way we stopped to check out Emerald pool. Considering it was late August and the weak winter there was still a substantial amount of water.

Emerald Pool

After our quick detour we picked up the trail again and continued on. Views are Nevada Falls begin to appear giving you that extra motivation just in case thoughts of quitting are crossing your mind. Just remember, start early, take your time and drink lots of water… 3 keys to finishing any hike!

First glimpse of Nevada Falls

The image above is all I need to keep me going. When it comes to exploring I am a very driven individual. I never doubted myself not even once.. I wasn’t going to let a few measly granite steps keep me from accomplishing this goal.

Finally! We reached the top! We went over to the top of the falls overlook and took in the gorgeous scenery that is the Sierra Nevadas. Looking down on the 600ft beast was a very humbling experience..

Looking down Nevada Falls

Getting here was not easy but the payoff was about to come in the form of the JMT! (John Muir Trail)

We had two options for our return trip, A) go back the way we came orrrrrr B.) venture off onto the JMT and doing a lollipop loop back to Vernal Fall Bridge.. Yeah we went with option B.) lollipopping it adds about an extra mile but it is well worth it!

Entering the JMT

Anytime you have the opportunity to loop a hike I go for it! Every step and turn offers something new. Its like 2 hikes in one. The JMT section descends down the opposite side of the canyon than the way you came up. The scenery and views are totally different. This section of the JMT is well shaded and gradually switchbacks it’s way down to the start of the mist trail. (A lot better than returning via the Mist Trail).

Nevada Falls can be seen from this side with great clarity. No obstructions what so ever!

Nevada Falls from the JMT

All in all we did about 8 miles round-trip. Explored new trails, saw 2 amazing waterfalls hiked on the JMT and still made it back to camp in time for lunch! This, like most hikes, was an amazing experience! Its definitely a must do for any hiker visiting Yosemite.

Happy Trails,

Alex G

To get to the trail-head one can take the Yosemite Valley Shuttle to the Happy Isle shuttle stop or you can drive to the parking lot just before the shuttle stop. The parking lot does fill up so arrive early.

This slideshow requires JavaScript.

  • 317 ft Vernal Falls
  • 594 ft Nevada Falls
  • 8 miles lollipop loop (via Mist trail and JMT)
  • 6.8 out and back( Nevada Falls)
  • 3 miles out and back (Vernal Falls)
  • 1.6 miles out and back (Vernal Fall Bridge)
  • 1,000 ft elev gain to Vernal Fall
  • 2,000 ft gain to Nevada Fall
  • hiking poles recommended

Like this:

Like Loading...

MT WHITNEY DAY HIKE

06 Thursday Sep 2012

Posted by Alex G in Distance hikes, Outdoors, Peaks, Strenuous Hikes, The 10 Essentials, Waterfalls

≈ 7 Comments

Tags

Day hike, forest, Hiking, Mount Whitney, nature, peak, summit, trek

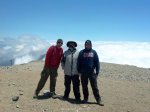
OC Trail Hikers on the summit of Mt. Whitney 14,508 ft!

Where do I begin… Lets see..

This was the biggest hike of my life and it was far from easy… It wasn’t physically tough but more mentally challenging. The hike to the summit is 11 miles with an elevation change of around 6,000 ft. The hike itself is relatively easy but the higher you get the harder it becomes to breath… and you get really high! In fact, at 14,508 ft., its the highest point in the lower 48!

The Fantastic 4

Our plan was to start hiking at midnight so that if we encountered any difficulties along the way we would still have plenty of time to recover. That idea I was fine, but the idea of getting to the portal and sleeping during the day before our hike totally backfired on us! We spent all day trying to sleep and couldn’t even squeeze in a minute of shut eye. Before we knew it it was already 11pm !

We geared up and hit the trail by 1130pm. Hiking in the dark is something I had only done a couple times before but only for 2 hours at the most… This was going to be a 7 hour hike in the dark until sunrise. It was nice to hike under the cover of darkness but the only downfall was that we missed all the nice scenery on the way up.

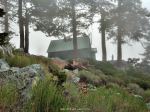
Sunrise at Trail Camp

We arrived at Trail Camp just in time to see the sunrise. After a quick break we refilled our water and continued on to the infamous 99 switchbacks. The switchbacks arent so bad on the way up.. The way down is a different story!

Switch-backing it up to Trail Crest

As you can tell by the look on my face the lack of sleep was starting to take its toll…

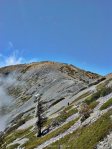
When you reach Trail Crest you are overcome with this feeling of accomplishment and joy and you almost feel untouchable!

Finally reached Trail Crest!

That feeling lasts about 2 minutes!… as you make your way down, yes down, Trail Crest you begin to realize that getting to the summit is going to require a little more work than a measly 99 switchbacks! If you made it this far, there is no reason to stop here although you might be slightly discouraged, just keep on trekking!

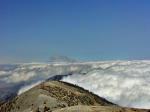
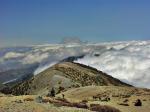
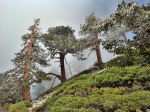
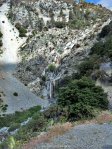
Along the Trail Crest/JMT you will have amazing views into Sequoia National Park. The views are like no other that I’ve experienced on any of my hikes Just plain amazing!

A look into Sequoia National Park

My lovely wife and myself on the Trail Crest / JMT Trail. Sequoia National Park in the background

On Trail Crest/JMT

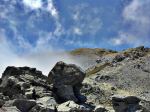
The final push to the summit is an amazing feeling… Knowing that all your hard work, training and sacrifices are about to pay off, makes that moment one that you will never forget!

Me making the final push to the top!

This was a wonderful journey I was fortunate enough to share this experience with my beautiful wife Martina and my hiking buddies Neal and Scott.

Our total hike time was 19 hours including breaks and stops to regroup. The altitude played a big roll in our long trek. Dealing with elevation sickness and the extreme headaches was something that required us to slow down and take lots of breaks,very frequently. It took us 11 hours to summit and 7 to return back down.

A permit is required to hike to the summit of Mt Whitney. Click here for info on entering the lottery.

Permits can be picked up at the MT Whitney Ranger Station/Visitor Center

Click here for directions to the trailhead

This slideshow requires JavaScript.

  • Elevation 14,508 ft
  • hike time 10-20 hours
  • 22 miles
  • 6,000 ft elev. gain
  • Whitney Zone permit required
  • start early and take your time. THE MOUNTAIN ISN’T GOING ANYWHERE!

Like this:

Like Loading...

MOUNT BALDY (via the Ski Hut Trail)

27 Wednesday Jun 2012

Posted by Alex G in Distance hikes, Outdoors, Peaks, Strenuous Hikes, Waterfalls

≈ Leave a comment

Tags

distance, Hiking, manker flats, mount, mount baldy, mount whitney training hike, mountain, outdoors, peak, san antonio, San Gabriel Mountains, ski hut, strenuous, trail, waterfall

SAN ANTONIO FALLS

With my Mount Whitney hike fast approaching I decided to get serious about my training. Already have done Mt Baldy (via Old Baldy Trail) which was a butt kicker I decided to try out the shorter but equally as hard route to the summit. At 4.2 miles and with a gain of 4,000 ft. This is the shortest and quickest way to the top.

The trail begins at the intersection of Mt. Baldy Rd and Falls Rd. there is plenty of parking and a Forest Adventure pass is required. The first mile of this hike is on a road. At .5 miles you will reach San Antonio Falls. On this particular May day the falls were less impressive than I had imagined.. but hey it was a pretty dry winter.

After making a sharp right turn past the falls the roads turns to the left and at about .8 miles  there will be an unmarked steep  single track trail to your left. This us the Ski Hut Trail. If you aren’t paying attention, you will miss it. We almost did if it wasn’t for a fellow hiker.

The next 3.5 miles are unbelievable, amazing and breathtaking! (Especially the breathtaking part) As soon as I started I immediately knew it was going to be a tough hike. I caught myself stopping more frequently than ever before.

It felt like the torture would never end!

What seemed to be an eternity was really only like an hour and a half of hiking… Finally through the cover of the clouds I got a glimpse of the ski hut.

FIRST VIEW OF THE SKI HUT ON A CLOUDY MORNING

Finally! The halfway point… great place to rest, re-energize, take a bathroom break and carb up before continuing on the final half of the hike.

ONE OF THE MANY PLACES TO REST AT THE SKI HUT

After a nice 30 minute rest. We geared up and continued on our mission! Just 2 more miles! Sounds easy but there is still one last hard section before the final push!

My buddy Neal

Winding our way up the mountain through a series of boulders and pines. There was no snow left on the mountain but there was a lot of ice covered trees. Which made for great photos.

After the last hard part the trail becomes relatively easy and the blue skies begin to open up indicating that the top of the ridge is getting closer. This usually gives me that extra motivation to keep on trekking!

NEARING THE TOP

YOURS TRULY, ON THE SUMMIT

This is probably the best 4.5 mile hike around. It offers a bit of everything.. A waterfall, a steep incline, beautiful scenery and an amazing view! Definitely a must do for all serious hikers!

  • 4.5 miles to the top
  • Difficulty – strenuous
  • 4,000 ft elevation gain
  • beautiful scenery
  • waterfall
  • 10,064
  • highest point in LA

RETURN OPTIONS:

  1. Return the way you came (9 miles)
  2. go down the devils backbone which will take you back to the trailhead with an added 2 miles on the return (apprx. 11 miles  r.t)
  3. go down Old Baldy Trail (6.4 miles) requires a car shuttle (11 miles r.t)
GETTING CLOSER TO THE SUMMIT!
ICY TREES ON THE FINAL PUSH
PHIL MYSELF AND NEAL

LOOKING TOWARDS THE DEVILS BACKBONE
HIKING ABOVE THE CLOUDS
TWISTED TREE

SKI HUT OUTHOUSE
VIEW FROM THE SUMMIT
YOURS TRULY, ON THE SUMMIT

ALMOST TO THE TOP
SKI LIFT

DEVILS BACKBONE TRAIL
ABOVE THE CLOUD LINE 10,054 FT
A VIEW FROM THE SUMMIT

ICE COVERED TREE
NO SNOW, BUT LOTS OF ICE
SKI HUT

FIRST VIEW OF THE SKI HUT ON A CLOUDY MORNING
ONE OF THE MANY PLACES TO REST AT THE SKI HUT


ON THE SUMMIT
LOOKING BACK UP AT BALDY, VIA DEVILS BACKBONE TRAIL
LOOKING BACK UP AT BALDY

ICY PINES
SAN ANTONIO FALLS

NEARING THE TOP

Like this:

Like Loading...

TOP OF YOSEMITE FALLS

16 Friday Mar 2012

Posted by Alex G in Outdoors, Strenuous Hikes, Waterfalls

≈ 4 Comments

Tags

falls, Hiking, outdoors, sierra nevada, switchbacks, upper, waterfall, Yosemite

This past weekend my wife and I packed our bags and headed to Yosemite. Since it was our first time going we had no idea what to expect or what trails to hike. We had recently seen an episode of Motion and decided that climbing to the top of the falls would be a great day hike and a good way to see Yosemite Valley from above.

Trailhead

The trailhead for this hike is located at the Camp 4 parking lot. At first glance one would see this sign and think 3.5 miles is a piece of cake, well, this hike is far from that! This 3.5 mile hike on the Yosemite Falls Trail consists of 60 switchbacks and over 2,500 ft of elevation gain. This hike was not easy! I’ve done some pretty tough hikes that were well over 15 miles and this hike was right up there with them in the difficulty level.

The beginning of the hike is rather easy. (in comparison to the last part) The trail starts to switchback out of the campsite. You will be hiking under the tree canopy for a good portion of this beginning section of this trail.

After about a mile and 20 switchbacks later the trail levels off for a little bit and you will come upon a lookout point named Columbia Rock. This is great place to take some pictures and enjoy the views.

view from Columbia Rock

From here the trail starts descending a few hundred feet and soon you will have your first look at Upper Yosemite Falls

First view of Upper Falls

By this time you will be in such amazement and might even think to yourself that this hike isn’t too bad.. well at this point id say you are about 2/3 of the way to the top.. but the last part is the hard part.. the last 40 switch backs are tough but if you’ve come this far there is no way you are turning back.

Don’t let the massive cliff walls intimidate you as the final push is only about a mile long.

Once you reach the top  you will have to drop down some steps along the cliff side HOLD ON, be careful and enjoy the sights ans sounds!

The effort will be well worth it as the views from the top of the 2,425 ft waterfall are unbelievable!

Top of Yosemite Falls


Yosemite Valley


my wife and I at the top of the falls

We averaged around 1 mile an hour and and made it to the top in 3 hrs 20 min. This included a 15 minute break and tons of stops for pictures. The trail takes you straight to the top where you will hit a junction for Eagle Peak trail(left) and Yosemite Falls (Right)

Happy Trails

Alex G

This slideshow requires JavaScript.

  • 3.5 miles (7 miles roundtrip)
  • 2,500+ ft elevation gain
  • 3-4 hours to reach the top
  • difficulty – strenuous
  • trekking poles recommended
  • amazing views

Like this:

Like Loading...

BLACK STAR CANYON TO SILVERADO CANYON

01 Thursday Mar 2012

Posted by Alex G in Distance hikes, Outdoors, Peaks, Strenuous Hikes, Waterfalls

≈ 2 Comments

Tags

beeks place, Black Star Canyon, canyon, cleveland national forest, distance, doppler, hike, Hiking, long, maple springs, peak, radar, santa ana mountains, Silverdo, trail

This 20 mile hike begins at the Black Star Canyon Trailhead and ends at the Maple Springs Trailhead. We used the car shuttle system to complete this hike, meeting at the Maple Springs Trailhead, leaving a car there and carpooling to the beginning of the hike.

This is a great hike with lots of points of interest: A coal mine, school bus, historic Indian site, Beeks place, doppler radar, Pleasants Peak and amazing views are things that you will experience along the way.

The hike begins at the parking lot just past the large steel gates.This is Black Star Canyon Rd. The first 2 miles are on a wide level fire road. Along the way you will see a closed off coal mine on the right and shortly after an old abandoned tractor and an old school bus in the creek are visible on the left.

New Bridge on Black Star Cyn Rd

School bus in the creek

A little past the the 2 mile mark you will see a house to your right, this is Black Star Bills house. If you see him say hi and keep on walking. When you reach the large concrete cylinders make a left and continue up the road. Making a right and dropping into the creek will take you to Black Star Waterfall

The next 3 miles are a gradual climb consisting of a few switchbacks and several hundred feet of elevation gain. (aprox 800ft) for the most part this section of the trail is exposed with very little shade and hardly and trees but around the 5 mile mark you will notice a bunch of Oak Trees on the right. This is the site of the Historic Indian village. This is a wonderful place for a break and an even better place to do some exploring. There’s a large amount of grinding rocks here which indicates that there was a large group of Indians that called this place home. There is a great lookout point located in the southwest section of the site.

Entering the Historic Indian Site

Grinding Rocks

Historic Indian Site

After a quick break and a small snack we continued on to the next of many points of interest on this hike. Next up, Beeks place, which is at the 8 mile mark. Beeks place sits on the Main Divide Rd and offers amazing views of Orange County, The San Gabriel Mountains and IE.

Entering the Cleveland National Forest

Beeks Place

We continued right, passing Beeks place and headed to our next destination, The Doppler Radar which is just over 1 mile from Beeks place.

Break time at the Doppler

On our way to Pleasants Peak we stopped at Little Pleasants Peak to check out the views

view from Little Pleasants Peak

Our next stop was Pleasants Peak (4,007 ft) This peak is much like the Santiago Peak but on a smaller scale of course. 360 views are not possible because of the many communication towers that call this place home but a quick scramble up the ridge provide awesome views!

Pleasants Peak

My beautiful wife an I before leaving Pleasants Peak

Leaving Pleasants Peak

From here we still had 8 miles to go! We thought it would be all down hill from here but we were mistaken. The rest of this trek on the Main Divide consisted of rolling hills once we reached the 17 mile mark we reached the junction with Main Divide and Silverado Truck Trail. We took the Silverado Trail (straight ahead)  for the remaining 3 miles to the car. Making a left will take you to Bedford Peak.

On our way down the Silverado Trail we had amazing views of Santiago Peak as the clouds rolled in.

Santiago Peak from Silverado Trail

Happy Trails,
Alex G

RECAP:

  1. ****STAY ON WIDE FIRE ROAD THE FIRST 17 MILES****
  2. First 8 miles are on Black Star Canyon Rd
  3. Make a right at Main Divide towards Beeks Place and continue for 9 miles
  4. At 17 mile mark go straight past the brown rails and take Silverado Trail for 3 miles to Maple Springs.
  5. Once on Silverado Canyon Rd make a right towards the Maple Springs parking lot
  • 20 MILES
  • 3,400 FT ELEV. GAIN
  • HISTORIC INDIAN SITE
  • DOPPLER RADAR
  • PLEASANTS PEAK(4,007FT)
  • 8 -10 HOURS TO COMPLETE
  • >>>>NO SHADE<<<<<
  • CAR SHUTTLE

CLICK HERE FOR MAP OF HIKE

This slideshow requires JavaScript.

Like this:

Like Loading...
← Older posts

Blog Stats

  • 118,832 views

Top Posts & Pages

  • AGUA CHINON TO THE SINKS
  • Ladder Canyon (Mecca Hills, CA)
  • BLACK MOUNTAIN -HENDERSON,NV
  • The Wally Waldron Tree
  • Mt. Baldy- Ski Hut-Devils Backbone Loop
  • BLACK STAR CANYON INDIAN VILLAGE

Enter your email address to follow this blog and receive notifications of new posts by email.

Join 401 other subscribers

Advertisement

Archive

Create a free website or blog at WordPress.com.

Privacy & Cookies: This site uses cookies. By continuing to use this website, you agree to their use.
To find out more, including how to control cookies, see here: Cookie Policy
  • Follow Following
    • Your Favorite Hiker
    • Join 61 other followers
    • Already have a WordPress.com account? Log in now.
    • Your Favorite Hiker
    • Customize
    • Follow Following
    • Sign up
    • Log in
    • Report this content
    • View site in Reader
    • Manage subscriptions
    • Collapse this bar
 

Loading Comments...
 

    %d bloggers like this: